Xian Yang Tee

Special expertise · Vacuum

Vacuum: high vacuum inside the cryostats I built.

My vacuum work is mainly high vacuum as thermal insulation inside the cryogenic probes I designed. As a research fellow I also used UHV deposition systems. This page sets out the problems and how I dealt with them.

PhD · 2009–2014Vacuum cans and pumped sample spaces for my dipper cryostats Research Fellow · 2017–2021Used UHV deposition systems for thin-film growth AlsoOperated a dilution refrigerator inside its vacuum jacket

Part 1 of 4

My approach to vacuum

The pressure a job needs decides the pumps, seals and gauges.

1.1 · Regimes and choices

Each decade of pressure is a different engineering problem.

Vacuum regimes and where my systems operated A pressure scale from atmosphere to ultra-high vacuum. Rough vacuum is reached with mechanical pumps, high vacuum with turbomolecular pumps, and UHV needs metal seals, bakeable parts and careful gauging. My cryostat sample spaces sat below 1e-6 mbar, my sputter growth started from 1e-7 Torr. 1000 mbar10⁻³10⁻⁶10⁻⁷10⁻⁹10⁻¹¹ mbar Rough High vacuum UHV SCROLL · ROTARY · ROOTS TURBO PUMPS · CATHODE GAUGES CF · BAKE · RGA Cryostat sample spaceBELOW 1×10⁻⁶ MBAR · PhD Sputter base pressure1×10⁻⁷ TORR · RESEARCH FELLOW
Each decade of pressure needs different pumps, seals and gauges. The dots mark where the systems I worked with sat.

I treat vacuum as part of the instrument. In a cryostat it is thermal insulation: the gas left in the sample space decides how well the sample is isolated from its 4.2 K walls. In deposition it is cleanliness: the base pressure decides how many stray molecules land in every film. Either way the questions are the same: what pressure the job really needs, what gas load the system has, which seals, pumps and gauges get there, and how to know the pressure is real.

Part 2 of 4

The problems I solved

Mostly from my cryostats, plus the deposition systems I used.

2.1 · Problem by problem

Mostly from my PhD probes, plus the deposition systems I used.

  1. 01Gas coupling the sample to its 4.2 K walls
  2. 02A vacuum can that fits the magnet bore and seals every cooldown
  3. 03Two volumes doing two different jobs
  4. 04Loading a probe into a 16 T magnet
  5. 05Growing films that depend on a clean chamber
  6. 06Keeping the lab’s vacuum systems in service

Cryostats: high vacuum as thermal insulation

01PhD

Gas coupling the sample to its 4.2 K walls

Why it’s hard
Residual gas carries heat between sample and can, creating gradients nobody set and background voltage at the nanovolt level.
What I did
Pumped the sample space below 1×10⁻⁶ mbar before every cooldown, with a radiation shield at stage temperature inside.
Result
Exchange gas suppressed; the sample sits in a controlled thermal environment.
02PhD

A vacuum can that fits the magnet bore and seals every cooldown

Why it’s hard
The can is the boundary between sample space and liquid helium, and must also leave room for the stage, shield and wiring.
What I did
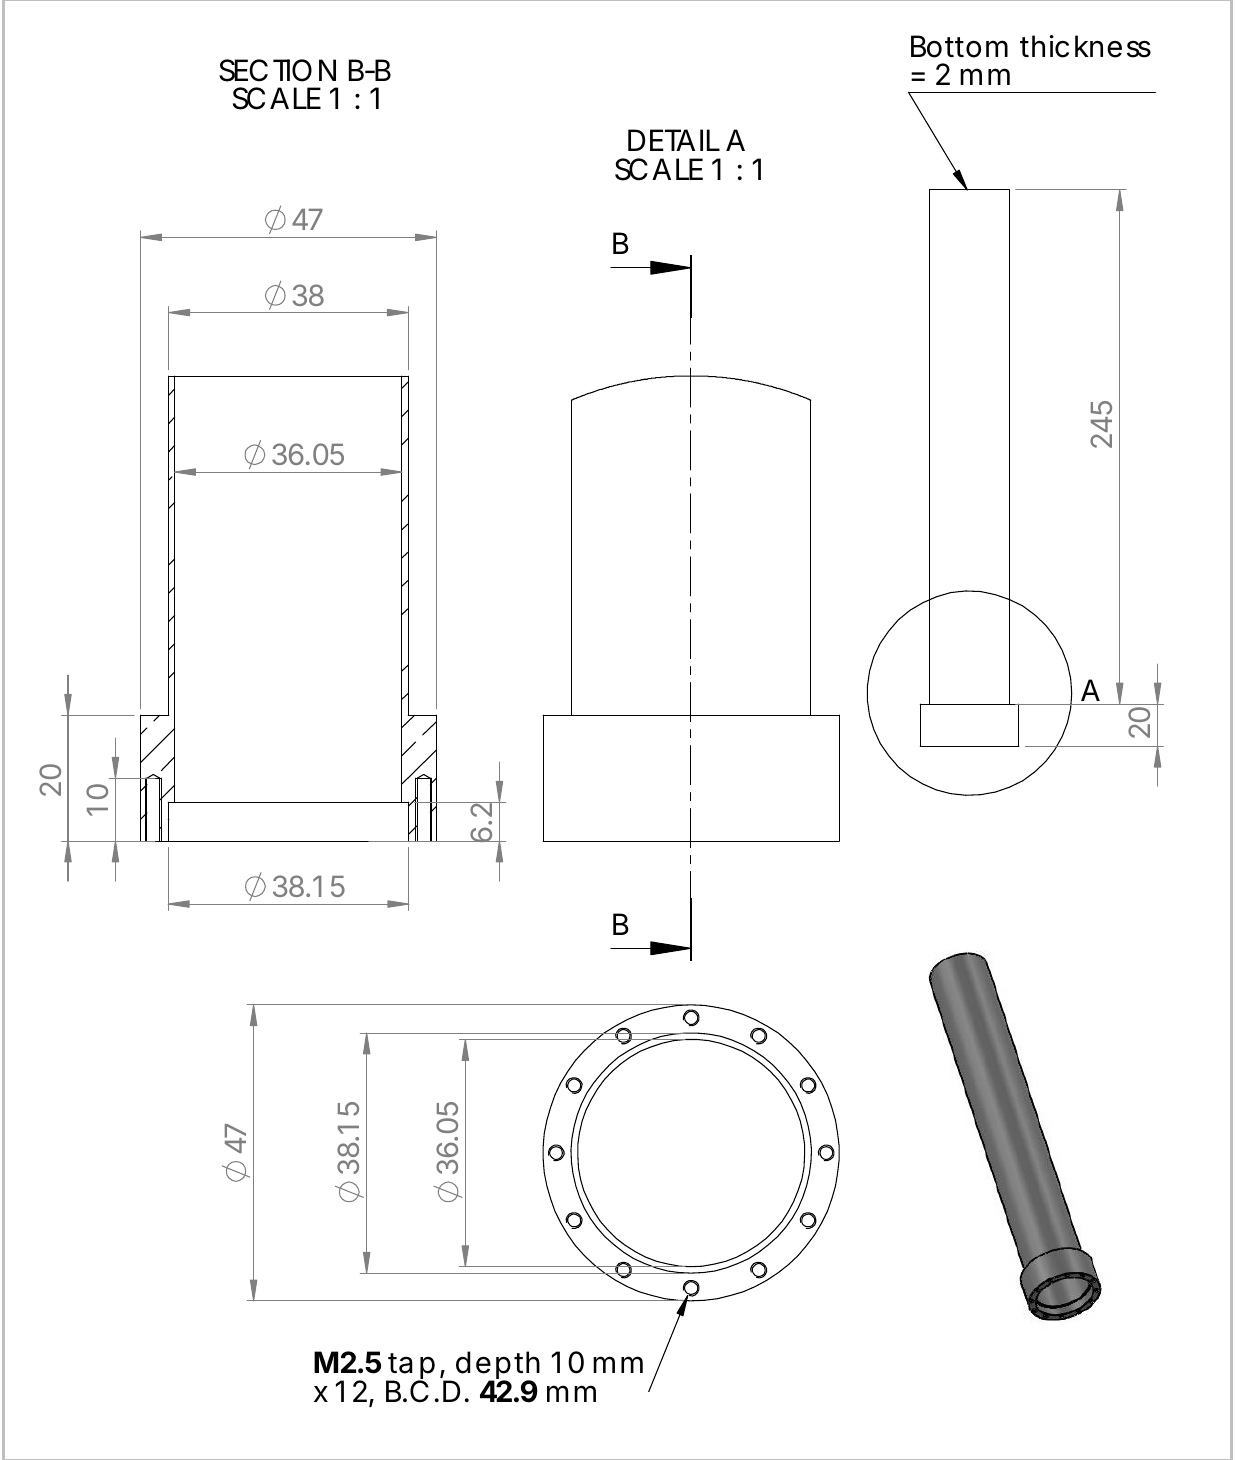
Drew the second-generation brass can myself in 2013: 245 mm long, 38 mm bore, a 47 mm flange with twelve M2.5 holes on a 42.9 mm bolt circle.
Result
A can sized for the 16 T magnet bore, made from my drawing.
03PhD

Two volumes doing two different jobs

Why it’s hard
The sample space needs high vacuum; the helium pot needs to be pumped as a refrigerator.
What I did
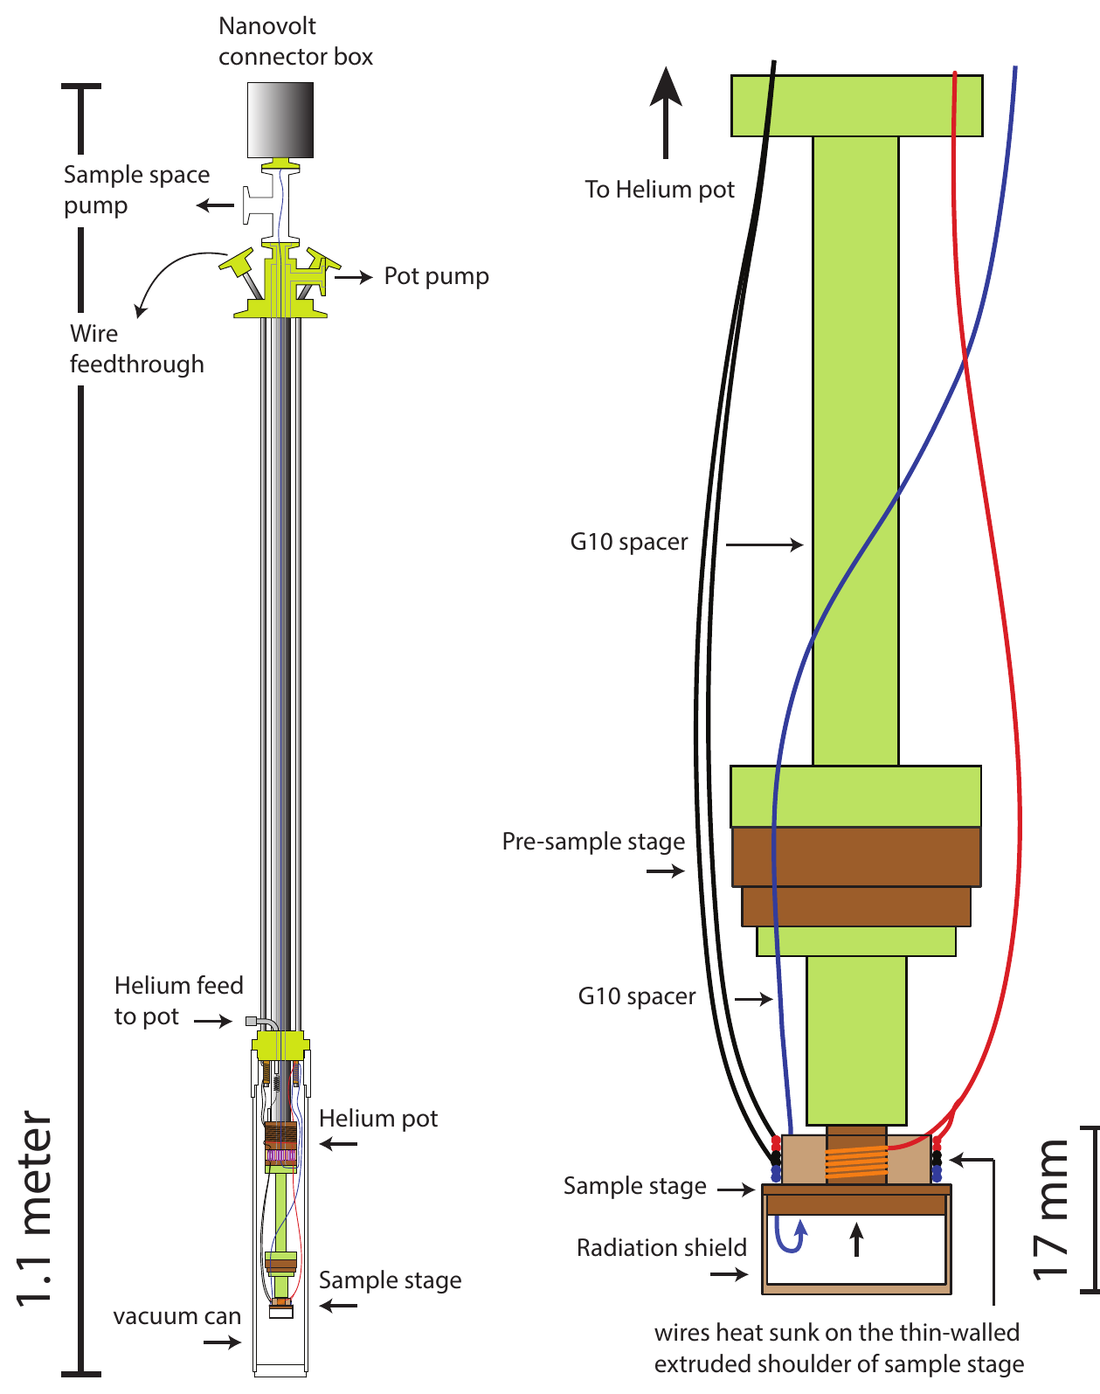
Gave the probe separate pump ports for the sample space and the helium pot, alongside the wire feedthrough and nanovolt connector box on top.
Result
High vacuum around the sample, and a pot pumped from 4.3 K to about 2 K.
04PhD

Loading a probe into a 16 T magnet

Why it’s hard
The probe has to enter a helium-filled magnet dewar without letting air in.
What I did
Used a sliding-seal adaptor on the magnet, with nitrogen and vacuum jackets insulating the helium chamber and pump lines run through bellows to a separate pump room.
Result
Probes loaded into the magnet dewar without letting air in, with the helium boil-off recovered by a reliquefier.

Deposition: working with UHV systems as a user

05Research Fellow

Growing films that depend on a clean chamber

Why it’s hard
Every molecule left in the chamber can end up in the film, changing its superconducting and magnetic properties.
What I did
Used the lab’s sputtering system for thin-film growth, starting runs only from a base pressure of 1×10⁻⁷ Torr, then sputtering in argon at 1.5×10⁻³ Torr and 15 sccm.
Result
Nb, Pt and MgO films grown to a repeatable recipe.
06Research Fellow

Keeping the lab’s vacuum systems in service

Why it’s hard
Worn pumps, faulty gauges and missing parts stop every system that depends on them.
What I did
Handled quotes and procurement for vacuum parts and servicing under the lab’s research grant: ConFlat adapters and spacers, a turbo pumping station, gauge and residual-gas-analyser repairs, and pump servicing.
Result
Parts and repairs in place, so the systems stayed usable.

Part 3 of 4

The evidence

What I designed and how the pumping was laid out.

3.1 · Drawings and schematics

The can I drew, and the probe it serves.

Engineering drawing of a brass vacuum can: section, end view with twelve tapped holes, and a 3D render
My drawing of the vacuum can, April 2013.
Schematic of the probe: vacuum can enclosing the sample space, helium pot, sample stage and radiation shield, with pump ports on top
From my thesis: the probe, with the sample space and helium pot pumped through separate ports.

Part 4 of 4

Why it matters to you

The same decisions about pressure, seals and gauging.

Why it matters to you

Vacuum in a lab instrument, vacuum on a test floor.

  • Pumped sample space under a probeVacuum or purged chambers in test handlers
  • Exchange gas and radiation as heat pathsCondensation, frost and convection at low test temperatures
  • Seal design and flange choiceLeak-tight chambers that survive thermal cycling
  • Gauge range and logged pressureInterlocks and traceable process conditions